| Author | Message |
|---|
rustbus
Super Moderator

Posts : 574
Join date : 2013-02-12
 |  Subject: Dash Cluster Restoration Sun Jun 30, 2013 11:58 pm Subject: Dash Cluster Restoration Sun Jun 30, 2013 11:58 pm | |
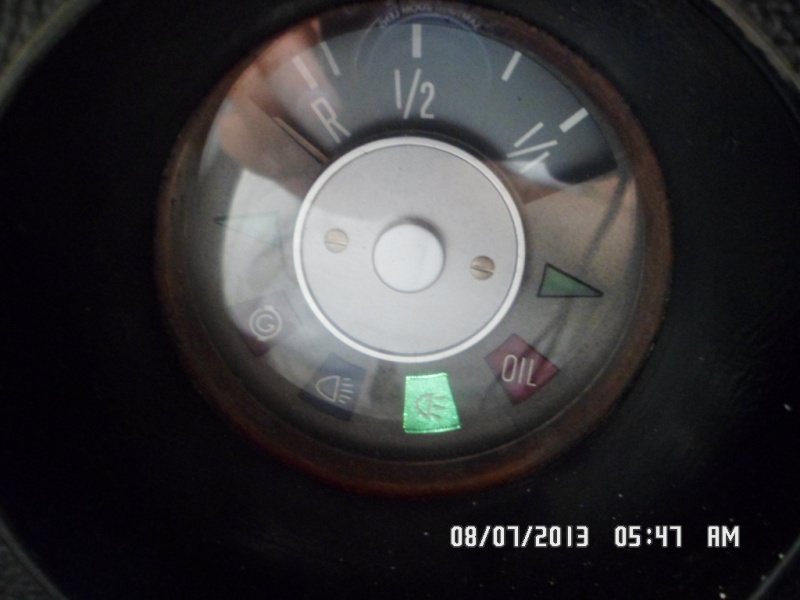
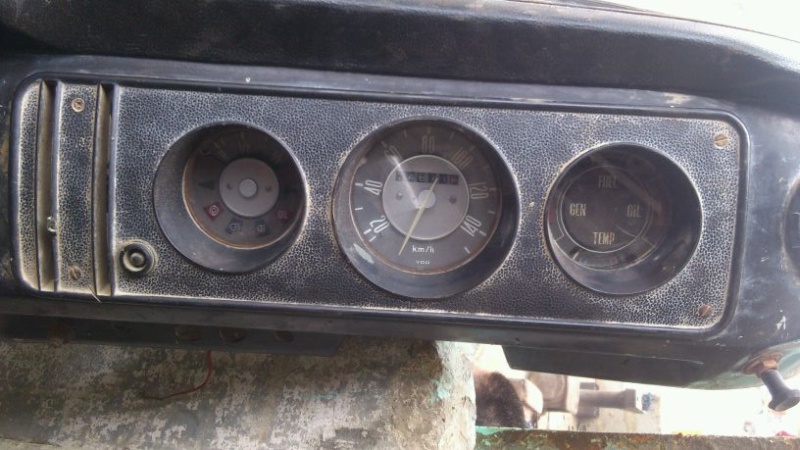
| 3 hrs back bending servicing and a lot of elbow grease and this is the result:  |
|
| | |
rustbus
Super Moderator
Posts : 574
Join date : 2013-02-12
| | Subject: Some Bits for Missionare Tue Jul 02, 2013 2:43 pm | |
| |
|
| | |
rustbus
Super Moderator
Posts : 574
Join date : 2013-02-12
| |
| | |
rustbus
Super Moderator
Posts : 574
Join date : 2013-02-12
| | Subject: More Wanted Bits Shipped Thu Jul 04, 2013 10:31 pm | |
| |
|
| | |
rustbus
Super Moderator
Posts : 574
Join date : 2013-02-12
| |
| | |
rustbus
Super Moderator
Posts : 574
Join date : 2013-02-12
| | Subject: 74 RHD Bay Replacement Dash Console Mon Jul 08, 2013 9:34 pm | |
| Just won this dash cluster on eBay. But I am only looking to use the console. The gauges/clocks would be used from the original console which is broke in upper left corner trim.  |
|
| | |
rustbus
Super Moderator
Posts : 574
Join date : 2013-02-12
| | Subject: Got lucky with a few hard to find parts locally Tue Jul 09, 2013 11:57 am | |
| |
|
| | |
rustbus
Super Moderator
Posts : 574
Join date : 2013-02-12
| | Subject: Re: Missionare - 1969 Early/Low Light RHD T2a Bay Window Walkthrough Microbus Wed Jul 10, 2013 11:45 am | |
| |
|
| | |
rustbus
Super Moderator
Posts : 574
Join date : 2013-02-12
| | Subject: Lost Treasure Found inside Missionare: OG M-240 (Low Compression) Motor Tag Wed Jul 10, 2013 11:56 am | |
| While I was at cleaning the interiors, starting from the front inner nose panel in the front cabin, here is what I found: The Original M-240 (Low Compression) Motor Tag that goes on the rear two bolts that hold the generator/alternator pedestal in place on the block! Has seen better days but its still a rare find.  |
|
| | |
rustbus
Super Moderator
Posts : 574
Join date : 2013-02-12
| | Subject: Walkthrough Seat Pads/Trim Set Wed Jul 10, 2013 9:18 pm | |
| |
|
| | |
rustbus
Super Moderator
Posts : 574
Join date : 2013-02-12
| | Subject: Re: Missionare - 1969 Early/Low Light RHD T2a Bay Window Walkthrough Microbus Fri Jul 12, 2013 2:54 pm | |
| When you've an original #Karachi vehicle registration book in this state in your hands, you know its one of those joyful times when you officially become owner of a vehicle (read 'another' VW)!  |
|
| | |
rustbus
Super Moderator
Posts : 574
Join date : 2013-02-12
| | Subject: CV Joints Refresh + New CV Boots Sat Jul 13, 2013 11:05 pm | |
| The passenger side CVs looked better since the CV boots on them are still good and look to have been recently replaced but the CV boots on the driver side axle were all torn up and the CVs were all caked including the flanges. There was a constant grinding noise that one could hear clearly once Missionare was on the move. All this is straight forward SHOT CV Joints situation. I do not have replacement CV Joints with me at the moment to fit the early bay, VW part # 211 501 331A. So there remained no choice but to remove the CV Joints and to get them repaired until brand new/NOS CV Joints could be located and brought in from abroad. So this night, I embarked on the removal of the Driver Side Axles to examine and refresh the CV Joints as well as replacement of the CV Boots that I had picked up from Lahore Autos when I was in Lahore bringing the bus home after it was bought. Here are a few shots after removal and rough clean up of the CV Joints to examine their true condition. Plz note that both the CV Joints are a mismatch. the Transmission side CV Joint is year correct LOBRO and bears 211 501 331A dated 2/68 while the wheel side CV Joint is LOBRO but bears 211 501 331B dated 12/73. Both needs replacement but the later one is rather in far gone a state. Unfortunately, there is no choice at the moment but to get them both welded/ground/repaired. LOBRO 211 501 331A - Dated: 2/68  LOBRO 211 501 331B - Dated 12/73  Shot CV Boots  Cleaned up flanges   In the morning these are going for a refresh while I work on the passenger side axle removal now. As shared on Elk's thread when I was servicing CV Joints on Elk, these two valuable write ups on this job would help you any day; 1. Tom's VW Pages - CV Joint Maintenance2. type2.com - CV Joints Maintenance |
|
| | |
rustbus
Super Moderator
Posts : 574
Join date : 2013-02-12
| | Subject: CV Joints Refresh + New CV Boots Sun Jul 14, 2013 10:50 pm | |
| Have had a busy day with the CV Refresh. Not the end though that I would have preferred but then got a lot of distance covered. Its always better to be patient with these small but important jobs than to rush into finish, especially when one is dealing with the drive terrain on the vintage VWs. First the complete dis-assembly pics:  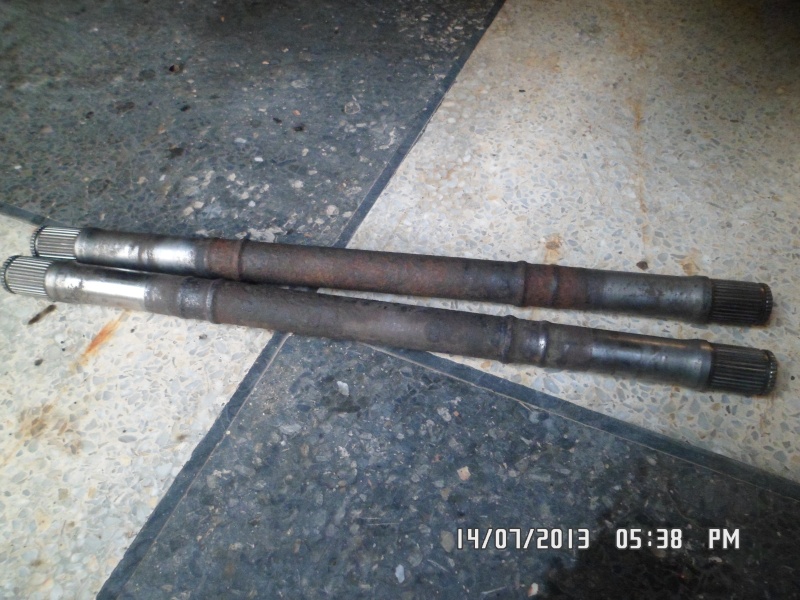 Dropped of the CV Joints with the best in the trade shop here in Multan for the repairs which they would return in the morning, all welded/grounded and polished. With that done, went on to buying the new CV Bolts as there were only 5 correct Allen head screws that were on rest of them all were hex bolts of different specifications. Also, went on to get the CV Bolt holding strips fabricated which again were missing, with only one present that was used as a template to fabricate the required 5 plates. Pics of the plates and Allen screws to follow later in the day when there is light to click a few neat shots. Next up was cleaning the drive shafts, oxidising them and painting them back to black. Here is a pic after it was all done:  Cleaned the flanges so that they are all set to receive the refreshed CV Joints+shafts. It was then when the nightmare appeared too. A broke screw in the transmission flange on the passenger side.    This screw will have to be removed before the CV Joints /shafts are installed. Mole Grips commonly known as wise grip should do it (I hope) else will have to weld a nut to the broke head to remove it. Will try mole grips in the daylight later today to see if that works. Fingers crossed. Fished out my ABUNDANT supply of LIQUI-MOLY CV Grease from stash to do the CV lbrication once they arrive in the morning, all repaired and prep'd.  |
|
| | |
rustbus
Super Moderator
Posts : 574
Join date : 2013-02-12
| | Subject: NOS OG SWF Turn Signal Switch from Indonesia Mon Jul 15, 2013 11:36 am | |
| Missionare does have a Turn Signal Switch which works perfectly but then its from a later year thus isn't a perfect fit on the steering column. Have been looking for the correct one which is extremely difficult to find and if its available its pricey as hell. Today an Indonesian friend posted a NOS SWF Turn Signal Switch for early bay (correct for Missionare year) on FB and I was quick to buy it out. Here is what it looks like:  |
|
| | |
rustbus
Super Moderator
Posts : 574
Join date : 2013-02-12
| | Subject: The "Oldest Bay Window of Pakistan" Debate Mon Jul 15, 2013 3:09 pm | |
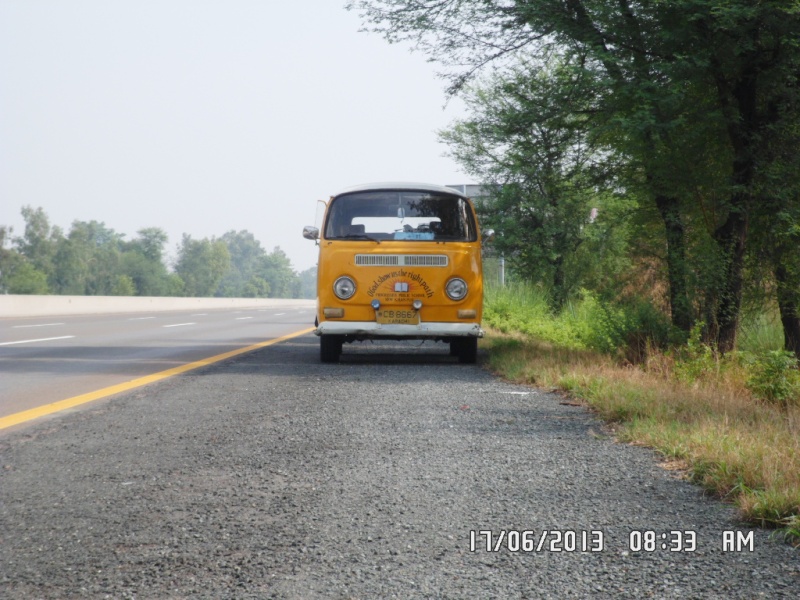
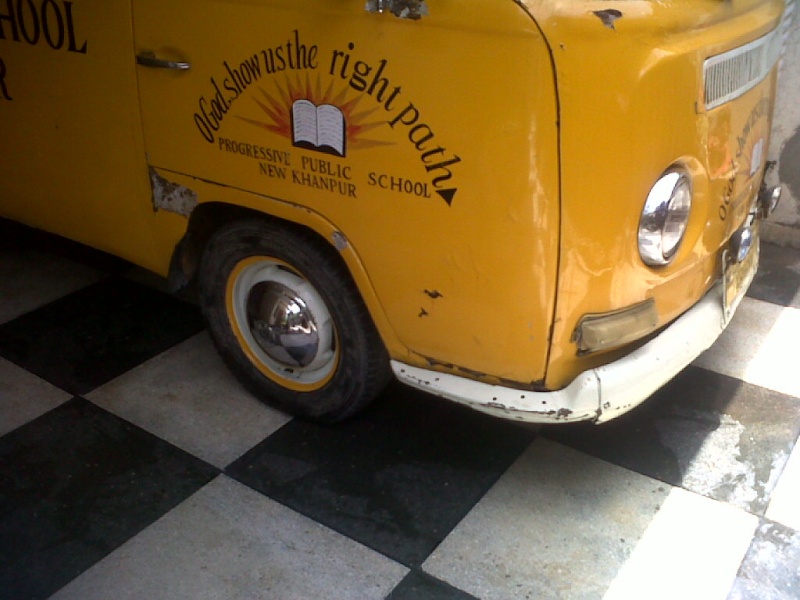
| As far as the documented early bay windows of the country are concerned, I dont personally remember any more than two early T2a. One is Missionare and the other known was sold quite a few month ago from Lahore to Rawalpindi and then within the year from Rawalpindi to an unknown location. I have been eyeing on that one for quite some time now and have been watching closely for every & the frequent resales it has gone through because before Missionare, it was the only known surviving T2a to me. Those who hang around keeping an eye on VWs for sale in the country would know it for sure. Here is how it looked until recently before it was sold to RWP.  It bears KHI registration # CE-8566 and is a 1970 model. Here is its Excise Verification from GOS Online Verification System.  But as compared to Missionare, bearing KHI plates too, Registration # CB-8667 it fails to qualify as the country's oldest Bay window. Because thats where Missionare wins;  Here is Missionare's GOS Online Verification data: 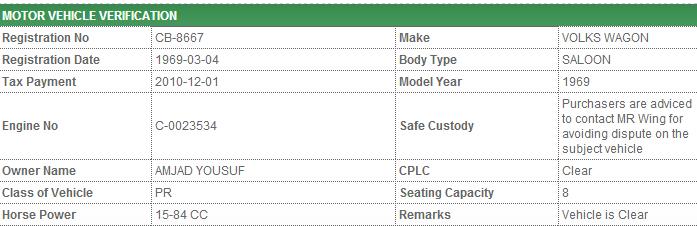 So this data does make Missionare the oldest known Bay window of the country, upto my knowledge. If any of you does know about any early bay windows still surviving and not yet documented, please do point me in its direction and lets find out which one is the oldest surviving T2a of the country. |
|
| | |
rustbus
Super Moderator
Posts : 574
Join date : 2013-02-12
| | Subject: Aging the Sign Writing on Missionare Tue Jul 16, 2013 11:37 am | |
| I have been repeatedly asked by VW friends if I was going to restore Missionare ground up. My answer has always been "YES" but not just yet. Like Patina, I like Missionare's overall battered character lot better than a shiny/blemish free finish. Only deviation from Patina's plan is fixing the undercarriage with new sheet metal imported from abroad and to minimize the panel beating as much as possible, while increasing the amount of welding at the same time. Missionare is probably the only existing Sign Written Bay Window too. Bearing a school signs which it has served previously. Sign written buses have always been my favourite. Not to mention that battered look that Missionare bears along with the sign writing. The sign writing "Progressive Public School - New Khanpur" was rather freshly done and gave a contrasting character to the battered / rusty look. It was discussed and debated among few VW friends and finally it was decided to "age" it to match the overall character of the bus. Since I don't plan to redo the paint job just yet, on Missionare, it looked only inevitable to age the sign writing to match the overall character.   Finished product coming soon, stay tuned. |
|
| | |
rustbus
Super Moderator
Posts : 574
Join date : 2013-02-12
| | Subject: Re: Missionare - 1969 Early/Low Light RHD T2a Bay Window Walkthrough Microbus Tue Jul 16, 2013 8:46 pm | |
| |
|
| | |
rustbus
Super Moderator
Posts : 574
Join date : 2013-02-12
| | Subject: Installation of Refurbished Axle Shafts + CV Joints + CV Boots Wed Jul 17, 2013 8:31 pm | |
| The Repair shop returned the repaired CV Joints today, all welded, grounded and polished. After inspection, all of the 04 CV Joints were cleaned and assembled thoroughly and then one of the two shafts was readied with new Brazilian CV Boots that I picked up from Lahore Autos/LHR, to be mounted on Missionare. Second one couldn't be assembled/installed because of the fact that unlike I had thought that only two CV Boots on Missionare were torn, all four were found torn. And since I just had a pair of the new CV Boots so there was no way both axle shafts could be made ready for an install. Will hunt out the CV boots tomorrow locally if I could find any to do the other shaft otherwise missionare is now grounded until some CV boot kits are brought in from abroad. Here are some pictures from the readying of one of the two axle/drive shafts and its installation:    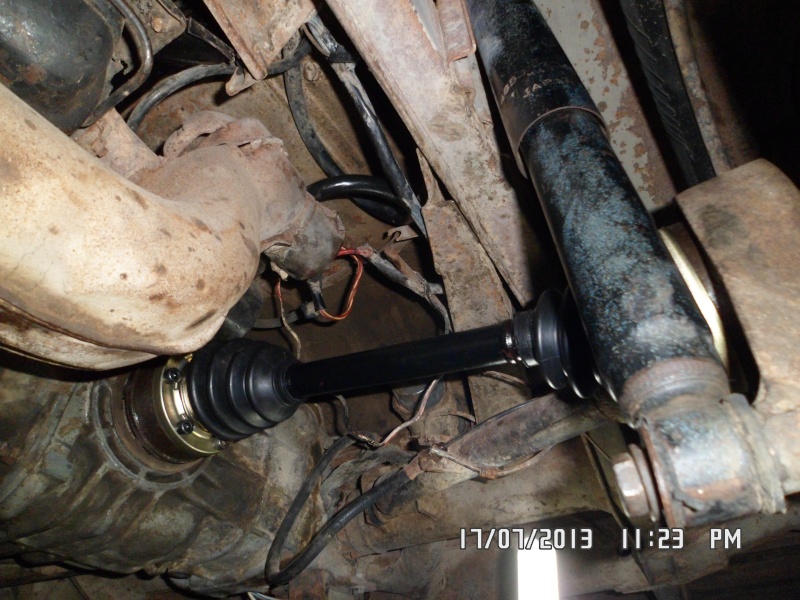 |
|
| | |
rustbus
Super Moderator
Posts : 574
Join date : 2013-02-12
| | Subject: Re: Missionare - 1969 Early/Low Light RHD T2a Bay Window Walkthrough Microbus Thu Jul 18, 2013 11:55 am | |
| - reezvaan wrote:
- The Repair shop returned the repaired CV Joints today, all welded, grounded and polished. After inspection, all of the 04 CV Joints were cleaned and assembled thoroughly and then one of the two shafts was readied with new Brazilian CV Boots that I picked up from Lahore Autos/LHR, to be mounted on Missionare. Second one couldn't be assembled/installed because of the fact that unlike I had thought that only two CV Boots on Missionare were torn, all four were found torn. And since I just had a pair of the new CV Boots so there was no way both axle shafts could be made ready for an install.
Will hunt out the CV boots tomorrow locally if I could find any to do the other shaft otherwise missionare is now grounded until some CV boot kits are brought in from abroad. Good news on the CV Boots, four of them were located today with a VW contact. He will be shipping all four tomorrow morning and those would be arriving in on Saturday so hopefully, the Missionare would be back on its feet on Sunday after I install the other/passenger side Drive Shaft. |
|
| | |
rustbus
Super Moderator
Posts : 574
Join date : 2013-02-12
| | Subject: Re: Missionare - 1969 Early/Low Light RHD T2a Bay Window Walkthrough Microbus Fri Jul 19, 2013 10:00 am | |
| |
|
| | |
rustbus
Super Moderator
Posts : 574
Join date : 2013-02-12
| | Subject: Re: Missionare - 1969 Early/Low Light RHD T2a Bay Window Walkthrough Microbus Sat Jul 20, 2013 8:46 pm | |
| Tony was kind to send the seats and with seats, the radio block off plate as well as hundreds of VW magazines from his collection as a gift.  |
|
| | |
rustbus
Super Moderator
Posts : 574
Join date : 2013-02-12
| | Subject: Front/Rear Cabin Heat Control Vents Sun Jul 21, 2013 5:57 pm | |
| Little something for the heating and making the front cabin look more complete.  |
|
| | |
rustbus
Super Moderator
Posts : 574
Join date : 2013-02-12
| | Subject: Interior & Exterior Sliding Door Handles Wed Jul 24, 2013 1:47 pm | |
| Sliding door with mechanisms and catches and roller was already sorted and held for shipping with Nick due to the fact that we couldn't locate a nice pair of interior and exterior sliding door handles. Thanks to Nick's consistent search, we now have, thus the whole thing can now be shipped to be fitted to Missionare.  |
|
| | |
rustbus
Super Moderator
Posts : 574
Join date : 2013-02-12
| | Subject: RHD Middle Flip Seat & Rear Bench Seat Fri Jul 26, 2013 11:40 am | |
| I am afraid I have been wrong about the interior on Missionare more than once. Initially, while making the purchase decision I had thought that the interior on the Missionare was original except the front passenger seat, which turned out wrong because only the Driver's seat was original to Missionare while all else seats were from Toyota Hi-Ace. Secondly, I had thought that Missionare was 7 Seater (2,2,3) arrangement but as it turned out, while I was working on cleaning the cargo floor, Missionare has all seat mounting plates intact which prove it to be an 8 seater (2,3,3). A little research on the RHD models confirmed it.  I am the "bone stock" type, cant stand the alterations and non-stock items. So had to hunt for the correct interior, all of it. OG Trim RHD Walkthrough seats were won on eBay for a hefty USD 230 as has been previously shared and are now shipped as well. That done, the RHD full width middle seat (flip option on left) and the rear bench seat remained to be hunted. Rear Bench Seat (full width) is all the same on all the bays so it was rather easily available but then had to fish out a year correct seat which took quite a bit of weeks. Anyway, the correct rear full width bench seat still in OG Trim was found and bought and is now awaiting shipping. Here is what it looks like;   As can be seen. the trim is not in excellent condition but then it still is OG and have the lower kick panel as well as the top rear trim. So I am thinking it will do for now. Once done with the front and the rear seats, the RHD Only Full Width Middle Seat with the Flip option on the Left remained in shadow. Talked to quite a few VW buddies in UK, because thats where you could expect to find a RHD specific seat and eventually one was located in Birmingham, was in good shape except that it had a tear on the flip seat upper corner. Nonetheless it was picked up and is now awaiting to be carried to me. Here is how it looks; 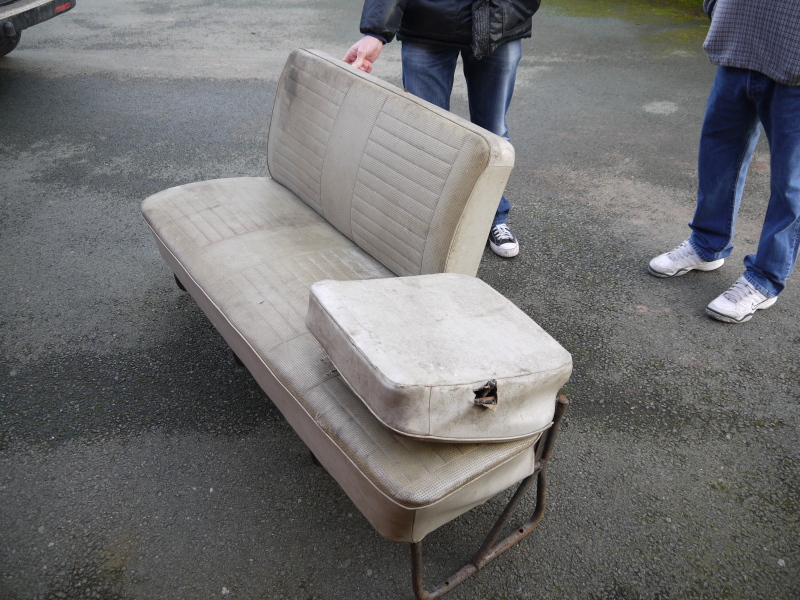 So we are all done with the original seats, finally! |
|
| | |
rustbus
Super Moderator
Posts : 574
Join date : 2013-02-12
| | Subject: Cleaning and Safeguarding the Cargo Floor Fri Jul 26, 2013 1:59 pm | |
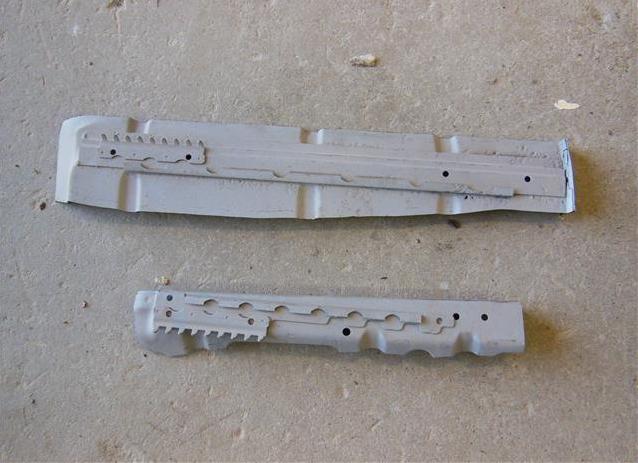
| After both the Toyota Hi-Ace seats were removed from Missionare's cargo area, it was stripped of the shattered mat and there was a hell of gunk that broke loose. There was so much caked dirt that the cargo floor pressings were totally flattened and it looked as if the floor was a flat sheet metal with no pressings. First had to scratch the caked dirt and then automated grinder mounted wheel brush was used to clean off the chipping paint from the cargo area, bringing the floor to bare metal which looked surprisingly very solid for a KHI car. All seat mounting/anchor points are still solid too! Once the cargo floor was cleaned, I used Grey Primer rattle cans to cover it up. Here are a couple of pics from the Primer spray.   The 2nd pic shows the area of the cargo floor covered by one rattle can of Grey Primer. Grey Primer coating is an interim coating until the time when Missionare goes for an inside/out sand blasting, to safeguard the bare metal from rusting. I do have a few BEFORE pictures of the cargo floor but not with me at the moment. I would upload those later. |
|
| | |
Sponsored content
| | Subject: Re: Missionare - 1969 Early/Low Light RHD T2a Bay Window Walkthrough Microbus | |
| |
|
| | |
| | Missionare - 1969 Early/Low Light RHD T2a Bay Window Walkthrough Microbus | |
|